Tuesday, December 21, 2010

Some Pictures


Newgrange Entrance Stone - We visited NewGrange, Knowth and Dowth, which Megalithic Passage Tombs, built circa 3200BC (older than Stonehenge)! The passage tombs have clear astronomical alignments such as the Winter Solstice Sunrise at Newgrange


We also visited Coumshingaun, a Corrie Lake in the Comeragh Mountains in Co. Waterford


This natural builder watches us bemused from its home built in 2 days, as we toil all summer!


Gerry and his joint!


Peter masters the chisel and mallet


Our stone mason Ken, places a lucky horse shoe under the front door step. The shoe came from Pauls cousins Jenny and Ciara whose pony Ricki died recently


Thomas - One Small step for man....


Grant, Alastair, Sam, and Graeme after raising the A-Frame


Nice hats - Thanks Els for keeping us warm in your cosy hand woven and knitted and natually dyed hats


Sam, Karen and Thomas plastering our Oven


Cottage Interior


Cottage Interior Again

Fairwell Graeme


Graeme, our last intern left last week for Scotland. We are very sad and lonely now that everyone has gone back home. Firstly, Thank you to Graeme for all your great work on the roundwood knee braces over the last few months - and all the laughs and good company.
Graeme, is going to Kenya, in January, to teach a Cob building project there. Best of luck with that project Graeme and we look forward to hearing all about it.
Thanks also to Ken, our stonemason, who is quite handy with them knee braces too!

Winter has arrived and our site has been white under snow for the last few weeks. We are slowing down into winter and finally have time to enjoy the memories shared with all our interns, and other instructors and visitors.
Wish you all the best for 2011

With love

Paul & Therese

Monday, November 15, 2010

Winter Is coming....


Winter is coming now. We just finished putting up the roof insulation and EPDM (water proofing) before the end or October. Karen has returned to Canada, and we miss you so much! Graeme and Paul are plodding along here. Luckily we Ken back doing some stone work at the entrance to keep our spirits high. So for the winter we plan to get some rest and maybe continue with some more knee braces!

Sunday, October 24, 2010

October

This has been a changing month. The leaves are falling rapidly off the trees and winter is setting in! Jim and Sam have left and gone back home to the USA. We miss you both so much and thank you both for all your many gifts and talents and for sharing them with us. To ease our pain Jo, Mirabel and Laurene are here to keep us laughing and do some building

Wednesday, September 22, 2010

Good Bye Alastair

Alastair left us last week, but not without doing some outstanding craftsmanship and giving us some great laughs.

We also had a pizza party last Sunday to celebrate Sam's 24th Birthday!, Les' arrival to stay with us for a week and to say Fairwell to Alastair.

Also we went to Cloughjordan Ecovillage to help Deirdre and Andrew and their 2 daughters Ciara and Saidhbh with cobbing on their new house - good fun and great to get some mud on our hands with all this timber work!

Monday, August 23, 2010


the bossman soaking up some rare sunshine while leveling the rafters.


jim helping karen stay sane on her mortise and tenon which looks great!


good ole jerry scribing a saddle on a rafter, notice the intense concentration!


The experts figuring out this massive puzzle.


Our hard work is paying off!!!


a walter segal method course a few of us did over the weekend at the hollies. with many helping hands this frame was built in just two days!


Finally finished with a mortise and tenon! these joints take almost a week to do but they sure look beautiful.

august


So far august has been a bit rainy but has held some great progress! All the rafters on the east side of the building are finished. Each one has four saddle joints in it to hold it in place and during that process we have made each one level with the rest using a big level. The west side of the building is going quickly with just a few more joints to do. Soon we will begin to put the roof on the east side. A few leaners( big diagonal braces) have been finished which really change the feeling of the building. Good times have been held all around with all these goofy people!

Sunday, August 1, 2010

Good Bye Thomas

Good Bye Thomas. Safe travelling home. We will all miss the laughs and your strong spirit. Thanks for you energy and skilled workmanship. Keep up the building.

Also welcome to Laurene who arrived today and will be with us for the next few weeks.

Tuesday, July 27, 2010

Timber Framing


All the hard work on the framing bed is paying off and the timber frame is going up quickly!


Monday, July 19, 2010

Holidays

Welcome back to everyone after our well deserved week off. Unfortunately Grant will not be returning.
Grant we miss you and wish you all the best in the future. Thank you for your time with us and your touches can be seen all over our building and site - Take care and stay in touch

Sunday, June 13, 2010

Week 10

Week 10

Week 10 saw plenty of rain as well as a transition for some of us from stone work to the timberframe. Though the increased precipitation muddied up the site, Thomas and Ken continued to finish the stone steps leading up to the double (party) doors. Once the quoins were placed, Ken moved to front door area, where Alastair and Peter began setting the first boulders in place.

On the timber frame, Alastair and Sam had been working on some of the saddle joints at the framing bed. Some tips related to saddle joints from Graeme, Alastair, and Sam include the following:
Keep the beam secured in one place, then rig the post to slide into and away from the point of contact.
Check the joint's fit, then mark the wood to be cut from the saddle. A scibe can be used to rough in the shape of the joint.
With a gouge, it is possible to 'twist' the bevel as you cut in order to slice the fibers more easily.

Cassandra and Noeline worked on the internal urbanite retaining wall at the beginning of the week, then created a saddle joint station inside the wind tunnel with Karen.

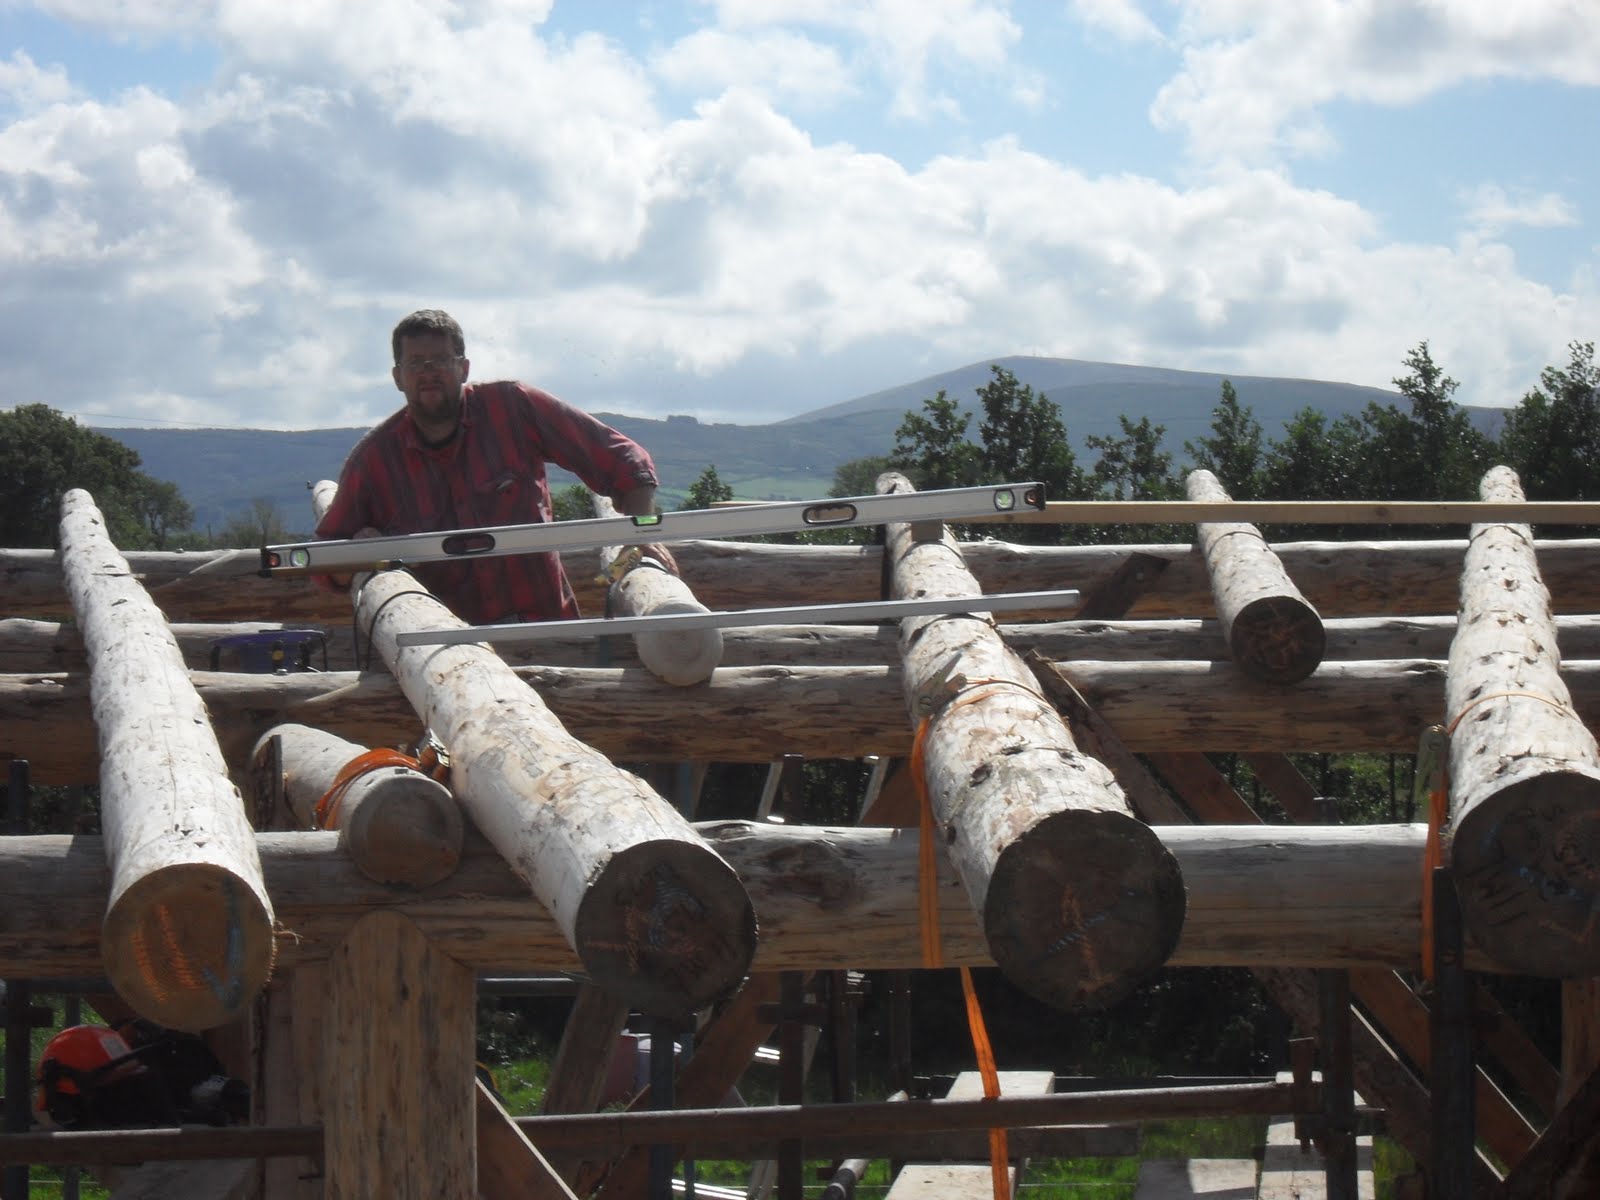
Grant began the week starting and finishing one of the roundwood shouldered mortise-and-tenon joints, then started to set up two more posts against the scaffolding for the next two joints to be cut by himself and Graeme. It takes some time to make sure that the scaffolding, post, and beam are all plumb, level, and square to the ground and to eachother. From Grant and Graeme, a checklist for setting up the joints follows:
Begin by cutting the post to length, leaving a few centimeters extra at the bottom.
Since there are saddle joints at the top of the post (already partially cut), measure down from the bottom of where the finished saddle will be to the top of the mortise to be cut and draw a line. Since our tenons are 17cm long, we then measured down 17cm to the bottom of the tenon and drew another line.
The tenons were cut with the beams still relatively near the ground. They were marked and knocked out quickly. To ensure the tenons were uniform, we created a plywood template to fit over the tenon as it was being cut. We had a matching template for the mortise as well.
To keep the posts from rocking or rotating as they were being cut against the scaffolding, we screwed a large wooden plate to the bottom of the post. Once the post was stood up, we hammered long nails through the plate and into the ground. We used rachet straps to secure the post to the scaffold, then braced it also with planks.
After hoisting the beams to the top of the scaffolding, we raised/lowered the scaffolding so that the tenons would intersect the post at the correct height (using the lines we had drawn on the post earlier).
The trickiest part of aligning the post and beam was making sure that the beams would intersect the post at a right angle. we made extensive use of the plumb-bob, level, string lines, framing square, and their keen eyesight to line everything up nearly 10' in the air!
After the beam was at right angles to the post (horizontally and vertically), we could begin cutting the mortise. A template and a bit of chainsaw work make the initial square slot rather simple. After this is cut, however, the beam must be slid back and forth, then the larger shoulder slot is cut to match the intersecting timber's shape.
As with the saddle joint, fitting the roundwood mortise-and-tenon takes plenty of time. Most of the tips for cutting the joints are the same.

On Friday, Sam, Alastair, Graeme, Grant, and Paul made final cuts to the A-frame and raised the bents in place. It was quite rewarding to see the accessory structure take shape so quickly after lifting it into place. That evening, after watching Butch Cassidy and the Sundance Kid, Graeme and Grant shaved their beards down to awesome, Redford-esque moustaches.

Saturday morning, the group left for the Boyne Valley to visit Newgrange and Knowth. After seeing these great neolithic wonders, we then wandered to Trim Castle for a tour of the keep, followed by a visit to the Hill of Tara.

Sunday, May 16, 2010

Week 6

This week we started the timber frame and the stonework! The framers selected all the posts, beams, and tiebeams. Which is easier said than done seeming as how there are about 200 logs to choose from! They also cut saddle joints in the top of the northern posts to recieve the beams. The stonework went great with the help from ken the mason. Its great fun and an even greater challenge to build the wall, its like a giant 3-d jigsaw puzzle!
IRISH STONE WALLS
Anatomy of a wall-
Through stones- have 2 faces, as they are the whole width of the wall. they go right through.
Bond stones- go 2/3 of the way through the wall. One face only. Very important element of ANY wall.
Face stones- Form the main face of the wall.
Quoins- Large stones at either end of the corners of a wall.
Pinnings- Stones that help to hold in place/ keep level larger stones: and to stabilize the whole wall. These should be added from the back.
Core/Hearting- these stones have no use on the face of the wall but are essential in stabilizing.

GUIDELINES FOR BUILDING-
A bond/through stone should be placed every meter in a stone wall.
Sort the stone by eye before you begin, then select your quoins, through stones, bond stones, face stones, core/hearting.
Lay stons on their natural beds.
Lay stones level and plumb at the face, with the bed lenght on the face greater than their hieght. EVEN IF UNEVEN IN SHAPE.
Keep an area of 2feet on either side of the wall.
Stones of equal height should not be placed beside each other unless they are low/thin stones.
Break vertical and horizontal running joints as soon as possible.
keep horizontal joints level.

A Frame

We selected the poles for the first A frame and laid them out on our 4x4m framing square. The A frame consists of two cruck posts, a floor beam, cross beam and two dowel posts. First we cut a lap joint for the cruck posts where they will meet and hold the ridge pole. Once that joint was complete we strapped the frame to the square, laid the floor beam in place and marked the joints to be cut with the bottom of the cruck posts. The method we found most effective for cutting this type of lap joint was to cut each side of the joint with a saw and then at several points in between. We then removed the waste wood with a chisel to make sure the flat surfaces of all the joints were on the same plane we used a level to make a plumb line on the end of all the poles. We also tried using a chalk line but the curved shaped of the poles made that technique quite difficult.
Once the floor beam was fitted into the cruck posts we put the dowel posts in place and cut the mitre joints so they fit snug to the cruck posts and lap joints so they fit into the floor beam. The tenon joints were the next joints to be cut into the top of the dowel posts where the shoulder beams would eventually slot on with their corresponding mortise joints. The final beam to be put in place was the cross beam which needed to be high enough above the floor beam to allow Sam to walk through without ducking! As the cross beam isn't load bearing we used gouged joints to fit it in place with the cruck posts.
The final task was to secure the frame with the 1 inch oak dowels we made with draw knives and the dowel maker. We drilled holes in all the joints with an auger, made 3 inch wedges and 2 inch cuts in either end of the dowels which protruded 1 inch either side of the joints. When all the dowels were knocked into place we moved the frame off our framing square and repeated the whole process again for the second A frame!

Sunday, May 9, 2010

Week 5

This week has been another busy week.

The first big announcement is that we have FINALLY finished peeling all of the logs that will be used for rafters and posts in the house. I don't know how the rest of the gang feels, but there were times I would see wood grain when I closed my eyes. While it was a great experience in learning the different ways to peel a log, I'm glad to have it out of the way so that now we can start using them.

We have also started putting in the foundation for the 'A' frame which is rumored to be possibly inhabited by our local tree climber, Sam. It's only natural that Sam would want to live in this thing because while he does love trees, and that is what the 'A' frame is made of, he's also leading the project from start to finish.

Grant the Viking has finished putting in the posts for the timber framed roof for the cob oven. With some consulting with Jim and a little help from me, Grant was able to complete the second phase of the project before he had to bake pizza that night.

Karen was busy in the garden this week and got a lot of planting and seeding down. We can't wait to be able to offset the our grocery shopping with the produce straight from our garden.
Karen also moved the compost pile to the back of the 'green tunnel' in order to create more space for another bed for the garden.

With the foundation laid, we got to work on pouring the posts cement foundations. These cement pillars will also give us the level of which to stack the wall's foundation stones up to.

While we have been working hard a few of us went off to hike up one of the main views in the area, and the main view of the house; Keeper Hill. Even though we followed the directions we still ended up getting... not lost, but not exactly to the correct spot we intended. With the help of some local knowledge we were able to find the spot we were looking for in order to start our hike and set off for the peak of the Keeper. It was rough going for a bit of the hike, but we found a nice big trail (read as: road) to finish up the last bit of the hike. We got to the top just in time to see a beautiful sunset and to take a few goofy pics.
After the hike down we also found the local pub where we talked to a few locals and shared a much deserved beer.

I'll be posting some more about the Rumford fireplace in my next entry, but for a short update:

We are going to have to redesign the smoke shelf as well as the flue for it, so that means tearing down part of the current setup which I know a lot of use don't want to do.

Head over to the Picasa pics and see what all went down this past week.

-Thomas

Friday, April 23, 2010

Cob Oven


Our cob oven was one of the first projects completed as a group. The first task was to clear and level the site, then build up a U-shaped dry-stacked stone foundation to a height of about 20". A board was set in place with cob to span the gap.


Atop the board, we created a 2” thick perimeter of cob about 4” high to act as a sort of bowl to hold our insulative layer of glass bottles and sand. Levelling the sand served as the base for the firebrick floor of our oven’s interior.


After laying the firebrick, we created a sand dome to act as the oven's form. The sand was moistened slightly (finer sand would have made the dome sculpting much easier, but we used what we had), then formed into a dome 40cm high with a base circumference of 60cm. Wrapping the dome in a clay-slipped hessian sack, we let it set overnight.

Two days later, we began to prepare materials for the next steps. A ‘fire-cob’ mix of 1 part pottery clay to 4 parts sand was the first layer (the finer the sand the better – large grits or rocks could fall from the oven’s ceiling on to your bread or pizza), and we slowly packed it around the sand form 8cm thick, always pressing down rather than in toward the sand base. It was important to build in even levels and keep each level perpendicular to the sand form’s curve. Though we had sculpted this layer around the door (12” wide and 10” high) as it was set in place, Christo suggested it would be easier to create the full dome, then cut the doorway out later.


After the fire cob mix was applied and then smacked with a board to compact it, a layer of slipped straw was wrapped around the fire-cob 12cm thick. This was followed shortly after by wet cob ‘pancakes’, applied thinly over the slipped straw insulation. We then dug out the sand form. The next week was spent drying the oven out. We waited two days after the outer layer had been applied, then began keeping small kindling fires inside of the oven. After several days, it was possible to see steam rising up from the oven, meaning that the moisture was travelling to the outside. Because the back side received little sun or wind, it was damp for almost a full week. Although a few small holes had appeared (straw catching fire and burning through), they were easily patched with slipped straw and cob. One week after the first kindling fires, we built a rather large one to finish the drying process. That evening, we baked our first sourdough breads using our hand-made peels.


Then the following evening we applied a coat of plaster and invited Paul & Therese’s family and friends over for a pizza party.

Wednesday, April 21, 2010

Last day in Ireland for this one, we had amazing weather and loads of laughs, learning and great food, stories, finds and ingenious clothes washing in the Ara river, thanks to Graeme, Sam and Peter for this entertaining episode! Thanks to Grant with out your peels no pizza!!!! Thanks to Sara for passing through and helping out!!! Thanks to Thomas for enjoying the cooking of all the cooks and keeping the mobile whole!, Thanks to Karen for the goodies, and care in the house and on the site!, Thanks to to Alastair for the humor, beercan sandwich and lovely lunch before I left. thanks to you ALL! for being supportive, hungry, eager and such great spirits to be around and share with!!! May the Pooka protect you and shine it's light on you in a mschieveous mannner to keep you humble, laughing and fired in spirit along your journey. Working together is a blessing to remember!
And last but not least thanks to Paul and Therese for making this all possible for me and all to come! You've an inspirational dream to be a part of!

Love and hugs,

Christo

p.s. I miss you all already!

Sunday, April 11, 2010

First week

The first week of the internship has been a full one! Timberframing the outdoor bathhouse/composting toilet has started, the earthen oven is built and drying in the glorious spring sun! End of next week the first baking session of pizza and bread! The garden is coming along and before to long the first lettuces should be ready to harvest. Therese has spoiled us the first week with amazing cooking, this coming week we will start on the foundation work and 101 other small projects. Looking forward to loads of learning, laughter and getting to know eachother better!

Saturday, April 10, 2010

New Photo Album

Our photo album is now online with pictures of our first week's progress. Check back often for new uploads: http://picasaweb.google.com/105763891851283878593

Tuesday, April 6, 2010

Welcome

Hi, Welcome to our Blog. We are Alastair, Graeme, Karen, Grant, Sam, Thomas, Peter and we are Natural Building Interns in Tipperary Ireland for the next seven months with Paul & Therese, Christo, Jo, Jim......