Sunday, December 4, 2011

Cold Season Update

Winter has arrived and most of our seasoned MudBandits have taken off to warmer climates or other adventures – only two have remained, tipping away in the glow of bright construction lights as the nights are creeping in earlier and earlier.


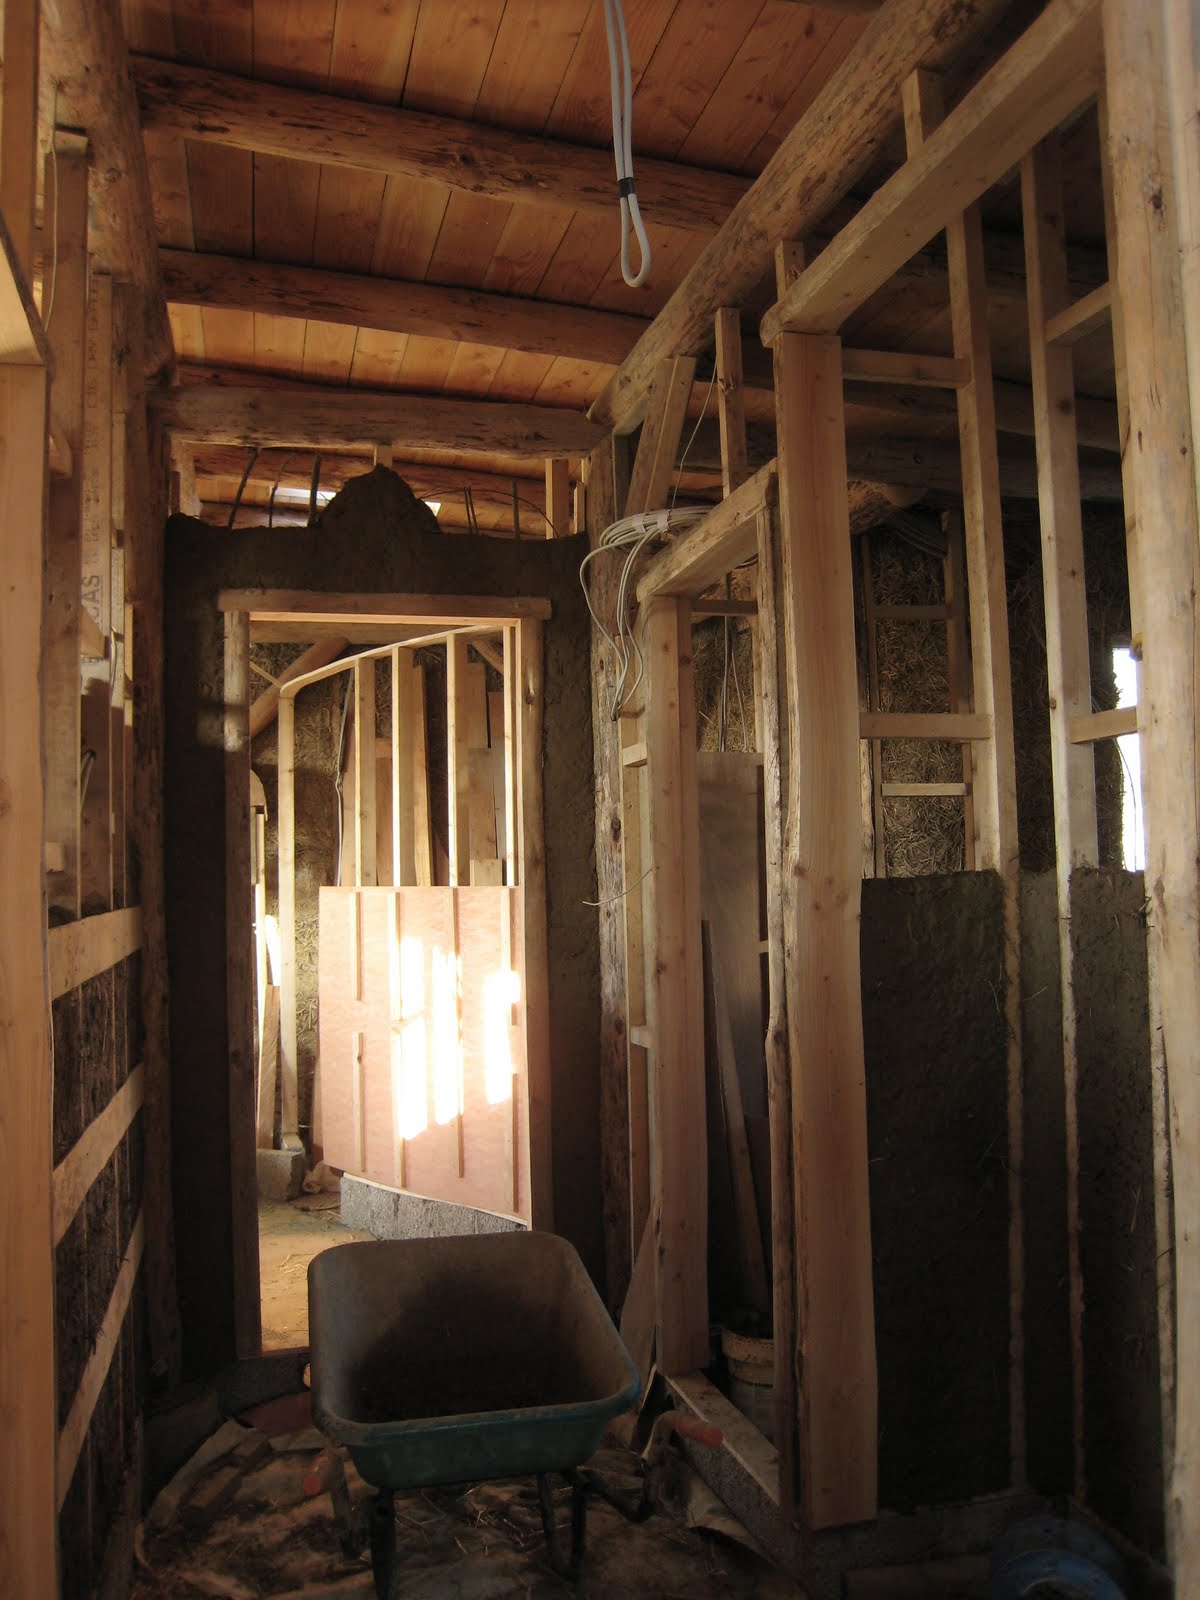
Left:Inner entryway framing with a template for a cob arch to-come. On the side, framing set for indoor cobbing with willow supports. Top Right: Interior hallway leading to Western side back door. On the right, fresh cob walls stay up with the help of willow supports. On the left, shuttered walls without willow supports.


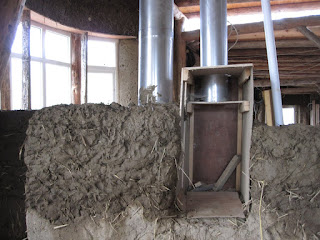
So, Lady Power it has been for the past month and a half - and a bunch has been accomplished too! Lower layer of interior walls has been set almost in every corner of the building. Inner entryway has received framing ready to accommodate a set of double doors and an eventual cob arch above it. Cob around chimney flue has collapsed and a new, wider base has been re-built. Most basecoat cracks have been cleaned and patched, and fridge has received its exterior cobbing with only its ventilation channels left (to let cool air circulate into it and keep the grub fresh). Karen has also been busy making shelving on top of two closets, and Pauliina has made another lift to the cordwood wall with great help from Coenraad who came with his full team to visit from HouseAlive, a natural building company in Oregon, US.


Cordwood wall in progress. Picture taken from kitchen space, behind it is the pantry.


Paul has been with us during weekends and set up more electrical lines through the framing of indoor walls – this is to prepare for another lift in the indoor cob; electrical wiring needs to be buried inside the cob and thus needs to be well prepped before building up the wall. This includes setting up electrical outlet and switchboxes to designated spots and running the cables through them.

We have learned a bunch doing our indoor work. Because our walls are thin (about 3 inches or 7,5 cm - the thickness of a two-by-three), we have built a stud framing structure to help support our cob infill. In a thin wall like this it would be of help to have quite a fine cob mix without a lot of big stones (yet, not necessary, as our mixes now are on the rougher side of the whole summer –meaning we will pick out the worst as we go :)


Karen cobbing above door frame

Apart from horizontal battons of two-by-two boards, we have also supported the interior cob with some recycled nails hammered to the sides of the studs, and, most effectively, with some willow branches tucked and woven horizontally at regular intervals. First we had to put up strips of shuttering to keep the cob up when it was freshly built and sagging – after moving on to our willow technology, we could skip putting up strips of ply for a support as the walls gracefully stayed up by themselves. This will save us both time and materials, and will help the walls dry quicker (a process which is time taking in any case as the weather of the season is chilly and damp).


Top: Pauliina cobbing interior walls

Above and Below: Karen &Johnny working on storage shelving to the right of the main entrance. Framing in front will eventually be filled with cob.


During the past months we have had problems to hold up the cobbing around our chimney flu. Reason to this was too much sculptural work in the beginning of the cobbing work, insteadof building up a solid foundation from which to trim off after cob has settled and dried a bit.

When cob is fresh, it tends to sag and be more vulnerable for the forces of gravity. This is why it is important not to end up thickening a wall the higher it goes– especially if dealing with a lean, towering structure. Even if the end result is planned with refinement, the base should be built with a rough hand and a solid footing for whatever goes up. Forms can be shaped afterwards and beautiful, elaborate sculptural work accomplished!


Collapsed cob surrounding chimney flue, with a new starting base on the left


The little cob cottage has kept us nice and snugly warm heated by the little wood stove. Thursday night we had the first frost, and saved the celery and some cabbage to make up a batch of sauerkraut. Winter is definitely settling in.


Pauliina and Karen in front of the Cob Cottage, our winter dwelling by the construction site

Saturday, November 5, 2011

Friday, October 21, 2011

Another Season comes to a close

Felix with Nye, Xavi, Sophie,Pauliina, Shawn, Sonya, Karen, Therese, Christo, Leila, Paul (Also Martin & Ben)

A sincere thank you to everyone who passed through and helped to make 2011 a great building season. Especially to our 7 interns - Felix, Pauliina, Shawn, Karen, Leila, Martin & Ben. We wish you all the best in the future and do please stay in touch.
Happy Building!!
Lots of love
Paul & Therese

Friday, October 7, 2011

The end of a season...

This entry is written by a visitor and not by an apprentice-proper. I offer you my perspective as a traveler who accepted a gracious invitation into the natural building world for two weeks, before returning to a full-time job in Brussels. If more city-bound workers could experience the joy of natural building, who knows how many paths would eventually veer away from what we imagine to be the future?


Greetings to the followers of the mud bandits. In the photo above you see some of us enjoying a picnic. Only a few minutes after we had doffed our clothes down to underwear and swimsuits and swum the frigid waters of Lough Derg, we watched the eponymous sub-aqua club arrive and don extra-thick drysuits, pulling on gloves and booties for good measure.

This was the last swim of the season, and during our two-week stay in Nenagh with Therese and Paul, Leila, Martin, Ben, Karen, Paulina, Ken, and Johnny we saw many stages of this ambitious project approach completion.

The base coat, for instance, had been applied over nearly the entirety of outdoor wall by the time of our September 30 departure. The mixing of this grey pre-plaster is quite labor intensive, and since the decision had been made to work without cow manure, one stage of mixing was the simulation of manure by adding chopped straw and cut grass, plus a liquid ferment to the clay, sand, and sawdust base. This was the first task I was given.

The artistic properties of tool-mediated physical labor become immediately apparent
when the 'tool' is replaced by its most basic ancestor, the hand.

One mix of base coat applied by three people has three different surfaces. A beautiful echo of each workers' personality. These hand movements must be deeply ingrained in our character, for even with deliberate care I
found I could not impressively mimic another style, nor could the others swipe my style. The same principle held for all of the earthen handiwork: cob walls bespeak their sculptors. Authorship at the price of hard labor: a compelling bargain both for the apprentices and the master.

Plastering occupied some of us at all times, as small delegations were sent to Cloughjordan daily to help a humble but well read and quite Irish stonemason finish weatherproofing his home before the cold of winter.

Plastering is difficult. Very frustrating if one has never before worked with hawks, floats, and trowels. There's a trick to getting the moisture of the float, the wall, and the plaster mix just right; and when you think you've got it, the professional shows up to admire what a poor job you've done and finishes the equivalent of a day's surface area, albeit sloppily, in the blink of an eye.

Some of us were decidedly better than others at plastering: Martin earned the stonemason's compliments, while I got a pat on the back and a 'I'll leave you and the plaster alone for a little while.' Through the combined efforts of ten people, however, we were able to finish a scratch coat and two float coats. One more float coat, and perhaps a skim coat, and the pretty little house will be bundled up nice and dry for winter.

Back on site the roof had threatened to blow off once or twice, and anyways the time was nigh for finishing off the roof with a couple dozen digger-loads of soil. Spreading a 2" layer over both levels of roof took almost two whole days to finish. Even in Timmy's expert hands, soil dug by a digger is full of roots and stones, and we might have had a beautiful little Zen garden on the rooftop except for Paul's interest in a living roof.


Those of us who were not raking soil above on the roof were raising walls below to the height of the timber
frame. Our bale-splitting and straw-stuffing may have been rude and quick, but with enough cob packed in between and a full covering of base coat atop we soon had a dirty roof keeping us clean and muddy walls keeping us dry.

There is vertical slit between the roofs where the level changes that is just visible in the above photo. Into this space were placed a long rectangular window on the top side
(the roof slants down toward the north) and an insulating pack of light straw-clay the remainder of the length.

Another large step in this home's completion was shaving the empty door frame, checking level and plumb, and adding (as well as cobbing over) the lintel. Quite feels like a door now!


Inside the house we approached the more sculptural elements of natural building. After finally reaching a decent level of cob wall around the hearth, we began the curvaceous design. The plan is to have an upward-curving inset that narrows as it follows the flue to the ceiling. Near the entrance to the hearth will be a rounded bench with just enough room to warm feet in front of the fireplace.
The approaching end of the apprenticeship lent a fervor to our activities and we had to force ourselves to slow down after a wall collapsing for the third time found us approaching cliché: 'Haste makes waste.' The rounded bench presented another opportunity to rush a beautiful design into reality before ensuring its structural integrity. On Paul's advice we knocked down our first attempt, cut a diagonal into the adjacent dry wall, cut teeth into that diagonal, and built what you see above. Not as fast, much more structurally sound, much better bound to the adjoining mass, and an absolutely beautiful completion to the curved wall. The joy of cobbing...

Soon, too soon, time had come to say our farewells and return to Brussels. We shared amazing conversations, saxophone duets, book recommendations, jokes, no small amount of sarcasm, and a deep connection born from the womb of that cob 'cottage', nursed by our hands, and enjoyed as the fruit of our collective labor.

Monday, September 12, 2011


Week Thirteen – 15th- 21st August

Stonework fever on site this week!

It’s time to build the retaining wall to the north side of the house. To help us with this we have the help of the wonderful Ken, with his inexhaustible patience, his fabulous laugh and his cool tools. The idea of the retaining wall is to keep the steep bank on this side from eroding over time. Instead of using stone for the whole length of wall we have found a supply of Urbanite. For those of you new to urbanite, it is broken up bits of concrete footpath. It is extremely strong, with a concrete strength of 35kN! Being a waste product, it is a free resource so the only cost is to transport it. The boys here did a couple of runs to pick some up from not too far away. Fair play to them for the hard work they put in lifting it into the truck. No easy feat, as we found out while sorting the pieces to prepare for building. Lucky they’re all grand strapping lads! Urbanite comes in a variety of shapes and sizes. It took some of us a bit of time to be converted to the beauty of the material but within the week Paul has managed to convince the sceptical of its hidden potential.

So we got to work on a rainy Monday morning with muddy puddles a-plenty. Ground preparation for the wall is all important. We needed to dig out a good base for the foundation of the wall which has to be at a right angle to the batter or slope of the bank. The batter should ideally be between 25 and 33 degrees for it to be effective as a retaining wall. A height of 1m and the depth of 500mm was decided upon. Once the ground was levelled and the angle dug out we made a timber guide to the wall dimensions, which we set into the bank. Initially we thought about doing a random stack but after laying the first few rows it was looking rather uniform, so it has become a coursed wall instead. Even though it’s now coursed it is still quite a puzzle to solve. Both brains and brawn have been fully exhausted this week! A couple of trips to the lake helped to ease the pain…

Ken gave us a great introductory talk on the techniques and best practice for building stone walls, highlighting Patrick McAfee's book Irish Stone Walls, published by O'Brien Press, as a great resource for more information on the whole process in detail.

As the week wore on and progress was made, bits of urbanite were flying as the rock chisels came out and got a good battering. A small seat was conceived in the sunny evening spot –fi ghts over this sitting spot are bound to ensue! There’s still a bit of work to be done especially around the approach to the house. This will be done with natural stones and will tie in to the urbanite wall. The bank will then be back-filled and will also cover the top of the wall.

Alongside the stonework, work on the posts for the timber frame of the new workshop has continued, preparation of more basecoat was done and applied to the light straw clay wall, frames for the windows in the balecob wall were made and the matting for the sedum was laid on the roof. Busy as usual!

Welcome back to Shawn and Sonja who are back from Germany for a couple of weeks. Great to have you with us again. Also welcome to Mathilde who has joined us from France. Our workforce is getting bigger and bigger –thankfully so are the meals!

Our yoga class also expanded this week with some new enthusiasts. Giggles were hard to stifle as we wobbled in the field trying to be trees!

A great weekend was had in County Sligo, where 12 of us headed to check out a couple of cob houses and naturally the natural beauty of the local beaches. It was great to see the different applications and flexibility of cob. Thanks to everyone who entertained us for the duration of our stay up in the sunny north-west -Marina, Noel, Ciara & Gareth, Colin, Féile & Family–we really appreciate it! We’ll be eating the spoils of the weekend for many meals to come..

Saturday, August 27, 2011

Light Straw Clay

Last week before vacation and we're still hard at work. We cut finished and installed interior sills, finishing lentils to be installed later. And after much time and detail from all of us, the bay window posts were completed. A trial run on a previously built template in the evening, and carefully installed by all the next morning. A perfect fit. Much to be proud of and the house is feeling more like a home.


A bit of digging from Timmy for an upcoming dry stack urbanite wall and the beginnings of our light straw clay wall on the north side of the building. A lot of setup but we were able to raise the panels a level a day.


A quick look at the wall from the interior. Notice the beautiful timber framing from last years interns.


We've built scaffolding to help as we move up the wall and a plank to help us transport the light straw clay from the bank. Pretty tight fit at top of the wall
.


Picking out posts for a shed and a couple of lifts shy of a complete wall finished off the week.


South side of house drying, so we can install lentils.

Thursday, August 18, 2011

Fresh From Holidays! Drainage, Woodwork & Fermented Brews...

Fresh from holidays - chores at site have left little time for blogging, yet here we are with some pictures and stories of progression!

We’re lucky to have gained new members to our group – Laurene from France will join us for some time, as well as Graham who interned here last year and is now back to bring his experience on timber framing along with stories of his building project in Kenya.


Light straw clay wall with freshly finished base coating on the left


Past weeks have included finishing up our light straw clay walls with patching the hollower parts with more straw. We’ve applied a basecoat onto the surface – basically, a sticky mixture of green grass clippings, chopped straw, clay, sand and water – all mixed together and fermented for a couple of days to bring up a unique fragrance before application :)


Double doors on South-Eastern wall


Double doors were set on the South-Eastern wall by Ben and Graham. Door on the Western side has also been set, along with lintels and sills to our bay window and Northern side light straw clay wall. We have tied “odds and ends” with cob, filled in spaces under window sills, sealed in doors and leveled out cob surfaces above windows in preparation for creating cob lintels.


Karen, Leila & the freshly set up bay window lintel!


On the Western side of our site a timber framing project is taking shape, aimed towards creating a workshop space. We have already cleared the land and set up a grid for posts. Some of us have had a chance to chisel out joints to fit together posts and beams. Others have been working on more knee-braces for the timber frame in the main building.


Michael chiseling out post & beam joint


With the help of Timmy and his digger, we put down drainage pipes on the North side of the house above the rubble trench. There are pipes to lead out rain- and grey water, as well as insulated pipes to bring in solar hot water heated in panels (yet to be installed) further up the hill.


Drainage set in - notice fresh base coat on light straw clay wall at the right behind Timmy's digger!


Work on electrics has begun from the Eastern side of the building, with electric chords being buried in the indoor cob walls. Some of us have been preparing the grounds for more roofing, patching the EPDM rubber and clearing the space in general for further roofing membranes. This week, our stone expert Ken has come for a visit to guide us into the secrets of stone work, in the form of a retaining wall.


Paul fitting electrics into cob wall

All in all, our building is taking new shape fast, and its walls are retaining an ever cozier indoor space more and more sheltered from the cooling weathers of the coming fall.


Our cozy indoors (picture from July right before holidays)

Saturday, July 2, 2011

Could it possibly be summer!?.. Mo' cobbin'!!


Still reeling from the loss of our buddies Xabi and Christo who have gone on cobbing and baking for those who need it most, we found some cheer this week in the shape of some sunshine and a fantastic new chap; Micheal. Great to have someone new to work with and hopefully if he doesn't like smooth jazz we can join forces against Martin's jazz crusade, gotta keep it rocking on the site!. Martin, jazzin up the veg with his sexiphone..

The walls are getting really high now so we started throwing cob in order to supply the builder, lots of opportunities for fun and games, my favourite is trying to get a three pointer into Shawn's builder's gap.
As we all got busy throwing cob and trimming and building

correcting walls is a pain in the rear!

higher and higher this giant mechanical monster suddenly appeared all growling and grinding, it was lovely Timmy and his digger, arriving to try his supremely skilled hand at cob mixing for the first time! .


Timmy in fighting form

The mean digger soon transformed into a soft toy as it started mixing cob, it was amazing to watch!. Hey, if you can't beat them, make them build nice things!.


In the meantime, lovely Sonia, Shaun's wife, left us after a week hanging with us and making lovely cake. Thanks Sonia, we'll miss you, hope you come back!

Shawn and Sonia, very proud parents of 2 lovely cakes, mmm!


Timmy 's digger was quite a help, lifting the giant mixes straight onto the highest scaffold positions for us to cob onto the now lintel height walls. The cob itself, although a bit rough was surprisingly good, definitely the way to go for fast building.
As we are now at lintel height, we had to make sure the dead men were made up and set in in order to fix the lintels, a task which Shawn and Micheal speedily completed. After all this, a quick tidy of the site and onto fitting more windows and starting slipstraw walls...

lovely wood!

Working the window pillars


Yeah mummy, very funny.. now I've got dirty feet!


Micheal reaching new heights


Big hairy arse, measured for window seats!


Thursday, June 30, 2011

Good Bye Christo & Xavi

Thank you both for all the memories and teaching and laughs. Its not the same around here without you. Hope to see you both soon again!

Tuesday, June 28, 2011

Windows and doors have arrived!!

We recieved our windows and doors and started cobbing them into the walls. We were fortunate to have a few days where the weather allowed us to continue our cob mixing and the walls are looking really beautiful. After the windows going up the house really started to take its form.

The Rumford fire place has had its first fire after connecting the chimney flue. It provides a very warm and cozy space. Paul gave a lecture last week about interior design and has challenged us to come up with designs for this space.
The bay window will be going in soon! It is a massive window.
We did a lot of wood work this past week which consisted of building window frames as well as frames for the clay slip infill system we will be applying here.
More windows!